Well, it's been a while, but that
doesn't mean I've been doing any less cooking. Since I last blogged,
I've made unsuccessful croissant dough, German bread, successful
croissants, mostly successful cupcakes, how-to-bribe-your-editor
cookies, not yet successful croissant dough, and started
experimenting with my own homemade spaghetti sauce recipe. There
will be blogs on some of those coming eventually, but this blog is
all about delicious, homemade, fresh baked CROISSANTS!!!
 |
| Unbaked croissants, they ended up much more golden brown! |
The recipe I used can be found
here. It, as the site explains, is their own personal overhaul of Julia Child's recipe from Mastering the Art of French Cooking. Her recipe can be found
here, and I actually used that with a combination of the first site for the procedure.
My first attempt at these didn't go very well. First, I tried to convert the ingredients from grams into things like cups, teaspoons, etc. I think that was my first problem. No, I take that back. Even though I
proofed my yeast, it was old and I don't think it reacted as much as it should. THAT was my first problem. Next, converting was the wrong thing to do. Then, I was only following the first site. The instructions weren't as clear, and I ended up with butter breaking through my dough everywhere. For the second attempt, I broke down and bought this little guy:
 |
| $19.99 but so far a great investment |
Yup, a gram (and ounce) scale. I have a feeling it's going to turn out to be extremely handy. Just how differently the dough turned out weighing everything in grams may have been worth it alone. I also bought new yeast.
Ingredients:
Bread Flour, 228g
Milk, 120g
Water, 13g
Sugar, 14g
Salt, 5g
Instant Yeast, 2.7g (a scant tsp)
Oil, 15g
Roll-in Butter, 125g (I used1 stick-8Tbsp-1/2 cup)
 |
| The essentials |
Mix together all of the ingredients except the butter. Kneed with a bread hook for 3 minutes at a low speed and 7 at a medium speed.
 |
| The mixer, doin' it's thang! |
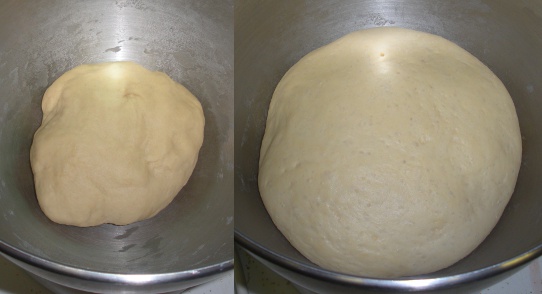
Cover (I did with plastic wrap to keep in the moisture), and let rise at room temperature for 3 hours.
 |
| It's hard to see, but this is how much mine rose |
While this is sitting, you can get the butter going. I laid out a sheet of plastic wrap, cut my butter in half length wise, and set the 2 peices next to each other about 1 1/2 to 2 inches apart. I then covered it with another piece of plastic so the rolling pin wouldn't stick. Give each stick quite a few good whacks to mush it down and soften the butter, then roll it out into a 5 by 5 inch square, like so:
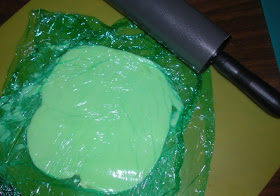 |
| Mmm... real butter! |
Let that sit in the fridge for at least an hour to harded up a bit so it's not just a melty mess all over. Once the dough and butter are ready, it's time to start folding the butter in. This is where I combined the 2 methods. The first site uses a block of rolled out butter where Julie Child spreads the butter on. Julie Child however only puts it on the top 2/3, the folds the bottom third up, then top third down, so there are 3 layers of dough with a layer of butter between each layer. The first recipe does this thing where it encloses the butter into a square first before folding. It was confusing because there are no pictures or explanation. I actually figured it out by reading the comments. Someone was confused and asked, then the original poster explained what was supposed to be going on.
 |
| Not quite 2/3, but you get the idea |
So you "book fold" in thirds, let it rest in the fridge for an hour (or however long it needs/you have time for), roll it out into a rectangle again, and repeat the book fold-resting 2 more times.
 |
| My edges weren't even this time but oh well... |
After you've done the 3 folds, it's time to roll it out into a 8x16inch rectangle. It may take a few times and a few rests in the refrigerator. Any time the dough seems to be getting too warm and sticky while rolling, you're going to want to let it rest in the fridge for a while. This part (along with the book folds), I'll do over a few days around my working/sleeping schedule to ensure that it was enough time to rest. Just be sure to cover it in plastic so it doesn't dry out, and lay it flat.
Once you've gotten your 8x16inch rectangle, it's time to cut your triangles. Trim the edges and cut into 4 smaller rectangles that are 8x4inches each. Then cut each rectangle from corner to corner to create 8 triangles.
 |
| I used a pizza cutter and it worked really well |
Next is the rolling the croissant shape. I stretched them a little to get the tip of the triangle centered. The directions on the first site say "roll up fairly tight, stretch out the tip with one hand when you roll the bottom with the other hand." And I'm not sure how else to word it. If you've ever seen a croissant, and if you haven't there are pictures in this blog and on those sites, you can pretty much figure out what you're doing.
 |
| For clarification, these already have the egg wash on them |
 |
| Ooooh, look at that deliciousness! |
The first site says that at this point you can put them the the fridge overnight to proof the next day, or freeze them. I just baked them all, but the next batch I have going I may try to refrigerate and freeze some so I can bake them fresh (and just to see how they freeze). If you're going to proof them right away, cover them in an egg wash (
1 egg beaten with 1 Tbsp of water) and let them proof at 80F until "very soft and jiggly" which is around 3-3 1/2 hours. It was a warm day, so I just did it at room temperature.
 |
| Aww, look at how big my little babies have grown! They're getting so chubby! |
Brush with another layer of egg wash, and bake! The first site says 425F for 10min, then turn down to 375F for 15min, Julie Child says 475F for 12-15 minutes. I followed the first site since that's the one I was mostly following. However, after 10 minutes at 375F I checked on them and they were already a golden brown color so I took them out. I'll have to play around with the time on the next batch. But that's it! They were done! I had 8 beautiful, delicious, homemade, fresh croissants to eat!
 |
| YUMMY!!!! |
They kept pretty well too. It wasn't until about 3 days later when I was eating the last one that they started to seem stale. Hence freezing some so I can bake them fresh every few days :) I stored them in a paper bag, but brought some to work with me in a plastic bag and they stayed crispy in the plastic over night. Over all they were really good and well worth all of the time put in. I can't wait to bake the batch that I'm working on now!


No comments:
Post a Comment